
Bring Back Your Car’s Headlights Brilliance
Headlights are one of the most critical components of your vehicle’s safety and appearance.
Over time, exposure to UV rays, road debris, and oxidation can cause headlights to become cloudy, yellowed, and less effective—diminishing not only your car’s visual appeal but also its resale value. In fact, studies suggest that cloudy headlights can reduce nighttime visibility and lower perceived vehicle quality by over 20%.
Whether you’re a DIY enthusiast or prefer to leave the job to the professionals, understanding how to professionally restore headlights is essential for maintaining that crisp, clear look.
In this comprehensive guide, we’ll walk you through the entire headlight restoration process—from the tools and materials you need (which you can purchase right away from our recommended selection) to the step-by-step methods for sanding, polishing, and applying a protective coating.
We’ll cover both DIY techniques and professional methods, answering key questions like “what tools do professional car detailers use to restore headlights?” and “how to apply PPF to protect restored headlights.”
By the end of this guide, you’ll have all the insights necessary to restore your headlights to a showroom-quality finish while also learning about essential tools and products to purchase to make the process easier and more effective.
Why Restoring Your Headlights is Essential

Impact on Aesthetics and Safety
Headlights are not just about visibility; they play a crucial role in your car’s overall aesthetics.
Cloudy, oxidized headlights can make your vehicle look neglected and worn out, which may adversely affect your car’s curb appeal and resale value.
More importantly, diminished headlight clarity reduces the brightness and focus of your beams, compromising safety during night-time driving.
Improved Visibility: Restored headlights ensure optimal light output, enhancing safety.
Enhanced Appearance: Clear headlights contribute to a modern, well-maintained look.
Increased Resale Value: A vehicle with pristine headlights is more appealing to potential buyers.
Benefits for Resale Value
Regular maintenance and timely restoration of headlights can add significant value to your car. A well-restored headlight setup not only looks impressive but also signals to buyers that the vehicle has been cared for meticulously. This can translate into higher selling prices and quicker sales.
Knowing how to professionally restore headlights not only improves your driving experience but also protects your investment.
Essential Tools and Materials for Headlight Restoration
A successful headlight restoration process depends on using the right professional-grade tools and materials.
Investing in quality products not only yields superior results but also saves time and money over the long run.
Below, we highlight the essential tools and materials, with a focus on the top products you should consider purchasing to optimize your restoration process.
1. Polishing Machines and Drill Brush Attachments
Overview
Professional detailers rely on dual-action polishers or dedicated polishing machines to restore headlight clarity.
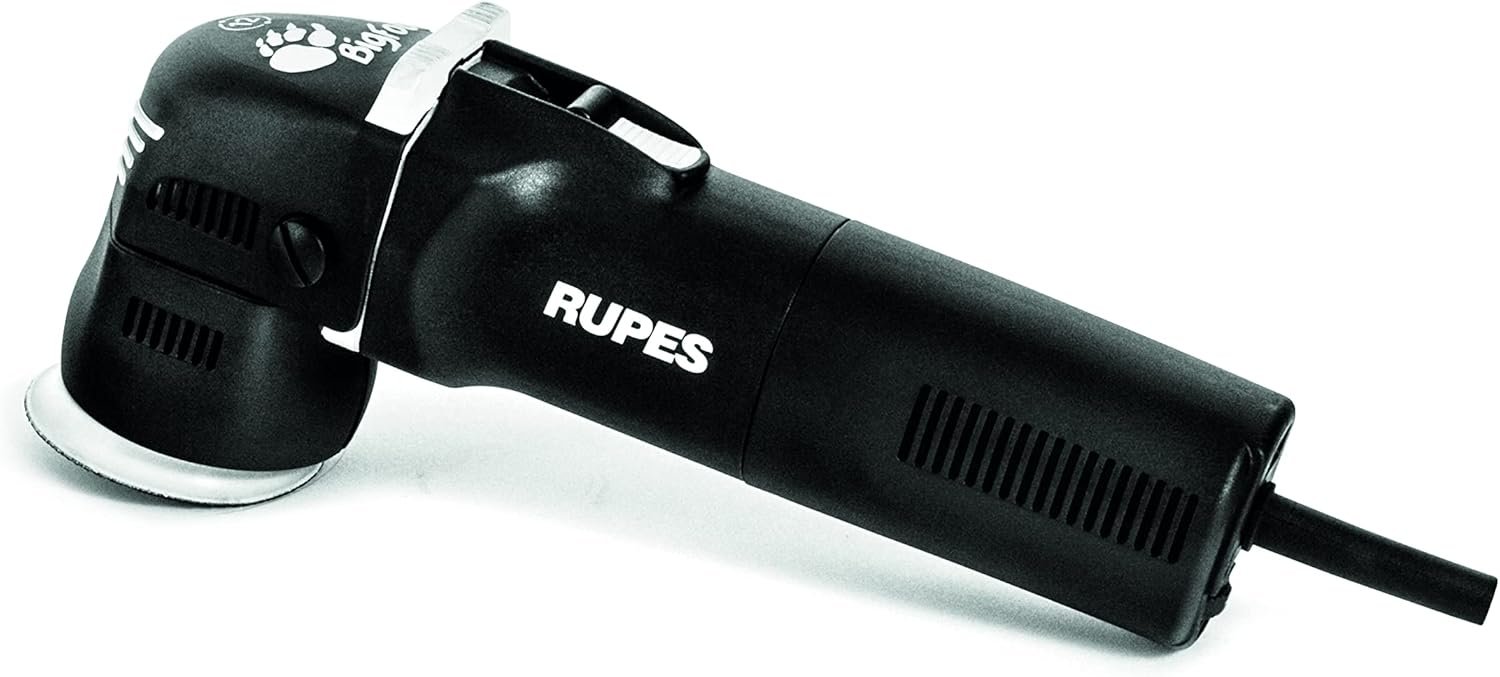
The Rupes LHR75E 3in Polisher is a prime example of a high-performance tool that provides precision and efficiency.
This model, known for its versatility and adjustable speed settings, is ideal for achieving a consistent polish on headlights. Additionally, drill brush attachments can be used for intricate areas where traditional pads might struggle.
Why They Matter
Precision and Efficiency: The Rupes LHR75E 3in Polisher ensures even application of restoration compounds, reducing manual labor and enhancing consistency.
Versatility: With interchangeable drill brush attachments, detailers can easily reach curved or hard-to-access areas on the headlight surface.
What to Purchase
Recommended Product: The Rupes LHR75E 3in Polisher is a top choice for headlight restoration, offering variable speed control for optimal polishing.
Where to Buy: Check with automotive detailing supply stores or Fresh Layer Mobile Detailing’s online store for premium polishers and compatible drill brush attachments.
2. Sandpaper Grits: 200, 400, 600, 800, 1000, 1500, 3000
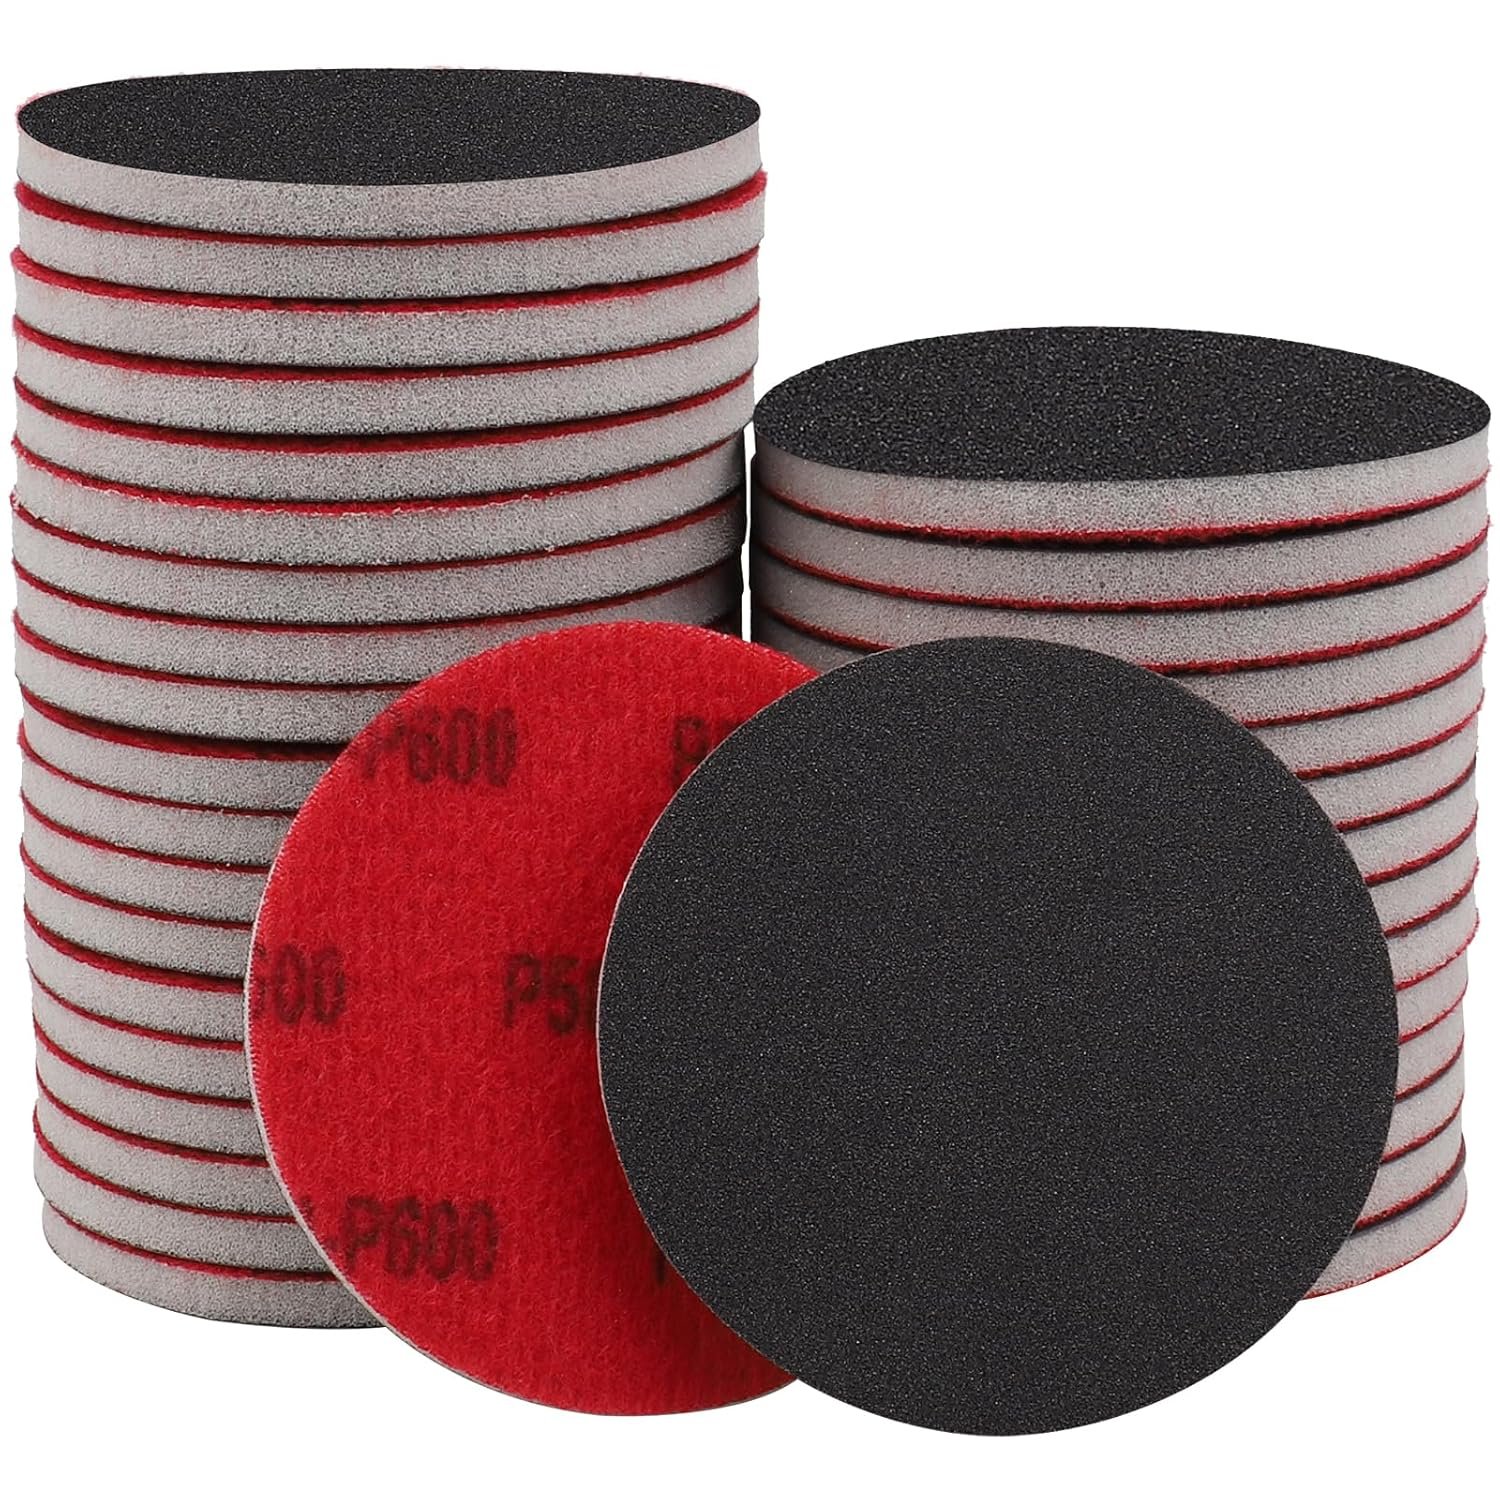
Sandpaper 3 in
Overview
Sanding is a vital step in the headlight restoration process, requiring a progressive sequence of sandpaper grits.
For a flawless finish, consider using a 3 Inch Hook and Loop Sanding Sponge Disc, which is designed to attach securely to your sanding block or machine and provides consistent pressure for uniform sanding.
Why They Matter
Effective Oxidation Removal: Coarse grits (200, 400) are essential for removing heavy oxidation, while finer grits (800 to 3000) refine the surface for a smooth finish.
Smooth Finish: Consistent sanding with the proper grit progression ensures that the headlight surface is free of deep scratches and ready for polishing.
What to Purchase
Recommended Product: The 3 Inch Hook and Loop Sanding Sponge Disc is an excellent choice for achieving a smooth, even surface.
Where to Buy: These sanding discs are available at automotive detailing stores and online retailers like Amazon.
3. Polishing Pads and Headlight Restoration Compounds

Overview
Polishing pads are essential for applying restoration compounds and achieving that crystal-clear finish on your headlights.
Rupes 3 in Polishing Pads are renowned for their quality and durability. They work exceptionally well with a variety of compounds, ensuring that any residual oxidation and minor scratches are expertly removed.
Why They Matter
Effective Correction: The right polishing compound, when applied with high-quality pads, can remove haze and scratches without damaging the headlight lens.
Enhanced Results: Rupes 3 in Polishing Pads offer a range of options—from aggressive cutting to gentle finishing—to meet the specific needs of your restoration process.
What to Purchase
Recommended Products:
Rupes 3 in Polishing Pads for various levels of correction and finishing.
KOCHCHEMIE Heavy Cut Coarse for removing heavy oxidation and scratches.
KOCHCHEMIE Fine Cut Polishing for a smooth, refined finish after heavy cutting.
Where to Buy: These professional-grade products are available from automotive detailing suppliers, Fresh Layer Mobile Detailing’s partners, and select online marketplaces.
4. Protective Coatings and Sealants

Overview
After restoration, applying a protective coating is crucial to maintain the clarity and durability of your headlights.
High-quality headlight protection products ensure that your restored headlights remain free from future oxidation and environmental damage.
Consider products such as Meguiar's Keep Clear Headlight Coating and CERAKOTE® Ceramic Headlight Restoration. These products provide a robust protective layer that not only enhances shine but also repels contaminants.
Why They Matter
Long-Term Protection: Protective coatings shield your headlights from UV rays, road debris, and moisture, reducing the likelihood of re-oxidation.
Enhanced Shine: A quality clear coat elevates the headlight’s gloss, keeping it looking new and vibrant.
Durability: Products like Meguiar's and CERAKOTE® offer professional-grade durability, ensuring that your investment in headlight restoration lasts for years.
What to Purchase
Recommended Products:
Meguiar's Keep Clear Headlight Coating: Known for its ease of application and long-lasting protection.
CERAKOTE® Ceramic Headlight Restoration: Offers a durable ceramic finish that provides exceptional UV and chemical resistance.
Where to Buy: Purchase these products from Fresh Layer Mobile Detailing’s online store or through reputable automotive detailing supply retailers.
Step-by-Step Guide to Restoring Your Headlights
Headlight Restoration Proces
Now that you have the right tools and materials, let’s walk through the comprehensive process of headlight restoration. This step-by-step guide covers preparation, sanding, polishing, and protective coating application.
1. Preparation and Safety Measures
Clean the Headlights
Wash Thoroughly: Use a mild car wash solution to clean the headlights and remove all surface dirt and contaminants.
Dry Completely: Dry the headlights using a microfiber towel to prevent water spots.
Mask Off Surroundings: Use painter’s tape to protect adjacent areas from accidental sanding or compound overspray.
Gather Safety Gear: Wear gloves, safety goggles, and a dust mask to safeguard against chemicals and dust.
Set Up Your Workspace
Well-Ventilated Area: Ensure you work in a well-ventilated, shaded area to prevent the compounds from drying too quickly.
Organize Tools: Arrange all your tools (sanding blocks, sandpapers, polishing machine, etc.) in order of use for a smooth workflow.
Understanding how to professionally restore headlights begins with thorough preparation and the right safety measures.
2. Sanding Process: From Coarse to Fine
The sanding process is crucial for removing oxidation and preparing the headlight for polishing.
Start with Coarse Grit Sandpaper (200-Grit)
Objective: Remove the bulk of the oxidized layer and any deep imperfections.
Technique: Wet-sand the headlight with 200-grit sandpaper. Keep both the headlight and sandpaper wet to minimize scratching.
Progress Through Finer Grits
400-Grit and 600-Grit: Use these to further refine the surface after the initial sanding.
800, 1000, 1500, 3000-Grit: Continue with these progressively finer grits to achieve a smooth, clear surface.
Rinse Between Steps: Always rinse the headlight thoroughly between sanding stages to remove any abrasive residue.
Tip: Consistently check the surface under good lighting to ensure the sanded area is even and free of deep scratches.
Following a progression from 200 to 3000-grit sandpapers is one of the most effective sanding techniques for headlight restoration.
3. Polishing Process: Achieving a Crystal-Clear Finish
After sanding, polishing restores clarity and shine to the headlight.
Apply Headlight Restoration Compound
Select the Compound: Choose a restoration compound that has proven effective for removing oxidation.
Application: Using a microfiber applicator or foam pad attached to your dual-action polisher, apply the compound evenly to the headlight surface.
Work in Small Sections: This ensures even distribution and prevents product drying out before buffing.
Polishing and Buffing
Use a Polishing Machine: Set your dual-action polisher to a medium speed and work in overlapping, circular motions.
Buff with a Microfiber Cloth: After the compound has been worked into the surface, use a clean microfiber cloth to buff the headlight until it shines.
Repeat if Necessary: For heavily oxidized areas, multiple polishing cycles may be required to achieve optimal clarity.
For the best headlight restoration results, use a high-quality restoration compound with a dual-action polisher to remove oxidation and restore clarity.
4. Finishing Touches: Applying Protective Coatings
The final step is to protect your newly restored headlights from future damage.
Select a Protective Coating
Options: Consider products like Maguers, Cerakote, or comprehensive professional headlight protection kits.
Benefits: These coatings provide long-term protection against UV rays, road contaminants, and oxidation.
Application Process
Even Application: Use a soft applicator pad or microfiber cloth to apply the coating evenly.
Curing Time: Allow the coating to cure completely according to the manufacturer’s guidelines. Avoid exposing the headlight to moisture during this time.
Final Inspection: Once cured, inspect the headlight under proper lighting to ensure a uniform, protective finish.
Applying a high-quality protective coating is key to protecting restored headlights and ensuring long-term oxidation protection.
Professional Tools and Products: What to Purchase for Headlight Restoration
For both DIY enthusiasts and professional detailers, having the right tools is essential. Here’s a detailed list of products you should consider purchasing to achieve the best results in headlight restoration.
Must-Have Tools and Equipment
Dual-Action Polisher:
Why: Provides consistent, even polishing with variable speed control.
Purchase Recommendation: Look for models known for reliability and ease of use.
Example: Professional-grade dual-action polishers available from automotive supply stores.
Drill Brush Attachments:
Why: Ideal for applying cleaning compounds and reaching intricate areas.
Purchase Recommendation: Ensure compatibility with your drill or polishing machine.
Example: High-quality drill brush attachments can be purchased from Fresh Layer Mobile Detailing’s recommended partners.
Sandpaper Kits (200 to 3000-Grit):
Why: Essential for progressive sanding and achieving a smooth, clear surface.
Purchase Recommendation: Choose wet/dry sandpaper kits designed for automotive use.
Example: Look for kits that include multiple grit levels to cover all stages of the restoration process.
Microfiber Cloths and Applicator Pads:
Why: Necessary for drying, buffing, and applying restoration compounds without scratching.
Purchase Recommendation: High-quality, lint-free microfiber cloths and soft applicator pads.
Example: Fresh Layer Mobile Detailing recommends premium microfiber products for best results.
Recommended Restoration Compounds and Protective Coatings
Headlight Restoration Compound:
Why: Formulated to remove oxidation and haze from headlight surfaces.
Purchase Recommendation: Choose compounds that have been highly rated by professional detailers.
Example: Look for restoration compounds with proven effectiveness for heavy oxidation removal.
Protective Coatings (Maguers, Cerakote, or Professional Chemistry Kits):
Why: These coatings provide a durable layer of protection that prevents future oxidation.
Purchase Recommendation: Select products that offer long-term UV and chemical resistance.
Example: Professional-grade protective coatings available through specialized automotive detailing suppliers.
Enhance your headlight restoration toolkit with these essential products. Visit Fresh Layer Mobile Detailing’s online store to explore our premium selection of detailing tools and protective coatings designed for professional headlight restoration.
Advanced Techniques Used by Professional Detailers
Detailed Process Overview
Professional detailers use advanced techniques to ensure every headlight is restored to perfection. Here’s how the pros do it:
Comprehensive Inspection:
Professionals start with a thorough inspection to assess the extent of oxidation and damage. This step helps them determine the best approach and products needed for each specific headlight.
Multi-Stage Sanding:
Working through a series of sanding stages—from coarse (200-grit) to ultra-fine (3000-grit)—ensures that the headlight surface is perfectly smooth before polishing.
Tip: Use water as a lubricant during each sanding stage to minimize scratches.
Precision Polishing:
Utilizing a dual-action polisher with variable speed settings, experts apply restoration compounds meticulously. They use interchangeable polishing pads (foam, microfiber, and wool) to refine the surface and remove any residual haze.
Tip: Work in small sections to ensure even coverage and avoid product drying.
Application of Protective Coatings:
Once the headlight is restored, professionals apply a high-quality protective coating that cures to form a durable, clear layer.
Tip: Ensure the headlight is completely dry before applying the protective coating to avoid trapping moisture.
Tools and Techniques Highlight
Drill Brush Attachment: Ideal for intricate areas that are difficult to polish by hand. It enhances the removal of stubborn oxidation from curved surfaces.
Professional Sanding Blocks: Provide uniform pressure and help achieve a consistent finish across the entire headlight.
Chemical Strippers (Optional): For extremely heavy oxidation, some professionals use a mild chemical stripper before the sanding process. This method must be handled with care to avoid damaging the plastic or paint.
Advanced headlight restoration techniques such as using a drill brush attachment and multi-stage sanding are critical for achieving a showroom finish on headlights.
Maintenance and Post-Restoration Care
Why Maintenance is Critical
Restoring your headlights is only part of the equation; maintaining that restoration is equally important. Without proper maintenance, even the best restoration can quickly deteriorate due to environmental exposure and daily wear.
Recommended Maintenance Routine
Regular Cleaning:
Wash your headlights with a pH-balanced car wash solution regularly to remove dirt and debris.
Use a soft microfiber cloth to dry the surface thoroughly, preventing water spots from forming.
Periodic Inspection:
Inspect your headlights every few months for signs of oxidation or damage. Early detection allows for prompt touch-ups.
If minor oxidation reappears, consider a light re-polishing treatment to restore clarity.
Reapplication of Protective Coatings:
Over time, the protective layer on your headlights may wear off. It’s advisable to reapply the protective coating as needed to maintain long-term protection.
Follow manufacturer guidelines for the recommended frequency of reapplication.
Avoid Harsh Chemicals:
Use only specialized headlight cleaning products and avoid household cleaners that may strip the protective coating.
Eco-friendly cleaning agents are ideal for maintaining the integrity of the restored surface.
Adhering to a regular maintenance routine is essential for protecting restored headlights and ensuring long-term oxidation protection.
Common Pitfalls and How to Avoid Them
Mistakes to Avoid During the Restoration Process
Inadequate Preparation:
Skipping the cleaning and drying steps can result in trapped contaminants that worsen oxidation.
Solution: Always thoroughly wash and dry the headlights before starting the restoration process.
Over-Sanding:
Using a coarse grit for too long can damage the headlight’s surface and create uneven results.
Solution: Follow the recommended progression of sandpaper grits (200 to 3000) to avoid over-sanding.
Insufficient Polishing:
Rushing the polishing process may leave behind micro-scratches and haze, compromising clarity.
Solution: Take your time with the dual-action polisher and check your progress frequently.
Improper Application of Protective Coating:
Uneven or too-thick application can lead to patchy protection and premature degradation.
Solution: Apply the protective coating in thin, even layers and allow proper curing time as per product instructions.
Ignoring Safety Precautions:
Not wearing protective gear or working in a poorly ventilated area can expose you to harmful chemicals and dust.
Solution: Always use gloves, safety goggles, and work in a well-ventilated space.
Avoiding common pitfalls such as inadequate preparation and over-sanding is crucial for achieving professional headlight restoration and a flawless finish.
Frequently Asked Questions (FAQ)
-
The best headlight restoration compound effectively removes oxidation and haze without damaging the plastic lens. Look for products with high ratings from professional detailers and detailed instructions.
-
While DIY methods can yield good results, professional tools like dual-action polishers and specialized sanding kits provide more consistent and lasting outcomes.
-
Depending on the condition of the headlights and the extent of oxidation, the process can take anywhere from 30min to 2 hours per headlight.
-
A typical progression includes 200-grit, 400-grit, 600-grit, 800-grit, 1000-grit, 1500-grit, and finally 3000-grit sandpapers. This sequence ensures the gradual removal of oxidation and scratches.
-
Apply a high-quality protective coating such as Maguers, Cerakote, or a professional headlight chemistry kit. This provides long-term protection against UV rays, moisture, and road contaminants.
-
DIY restoration can be effective if done carefully with quality tools. However, professional headlight restoration generally offers more consistent, durable results, especially for heavily oxidized surfaces.
-
Common mistakes include inadequate cleaning, over-sanding, rushed polishing, and improper application of protective coatings. Following a detailed, step-by-step process is key to success.
Conclusion and Final Recommendations: Restore and Protect Your Headlights Like a Pro
Restoring your headlights to a crystal-clear, showroom finish is an art that combines precision, quality tools, and the right techniques.
By understanding how to professionally restore headlights, you can remove oxidation, haze, and scratches, transforming cloudy, degraded headlights into a brilliant, clear display.
Whether you choose to tackle the project using DIY methods or opt for professional services, following a detailed, step-by-step process is crucial.
Key takeaways from this guide include:
Preparation is Critical: Thorough cleaning, drying, and masking off surrounding areas set the foundation for successful restoration.
Follow a Progressive Sanding Process: Use sandpapers from 200-grit to 3000-grit to gradually remove oxidation and smooth the surface.
Polishing and Protective Coating: Utilize professional-grade compounds, polishing pads, and protective coatings to restore clarity and protect your headlights from future damage.
Invest in Quality Tools: For best results, purchase essential tools such as dual-action polishers, drill brush attachments, and premium restoration compounds. These investments will ensure you achieve a flawless finish every time.
Regular Maintenance: Once your headlights are restored, maintain their clarity through regular cleaning and periodic reapplication of protective coatings.
At Fresh Layer Mobile Detailing, we are passionate about delivering outstanding automotive care. Our range of premium headlight restoration products and professional detailing services is designed to help you achieve a flawless finish and protect your vehicle’s appearance for years to come.
Ready to restore your headlights to their original brilliance?
Explore our premium headlight restoration products and schedule a professional service with Fresh Layer Mobile Detailing today. Whether you’re a DIY enthusiast looking to purchase quality tools or a car owner in need of expert restoration, we have the solutions to meet your needs.


